Forgot password?
Min 8 characters and 1 digit.
or Sign up with

Windows Easy Installation

1. Download

Download the latest version of XAMPP for Windows from [HERE].

2. Install

After downloading, install the program to what directory you want.( Example: c:/xampp ). Minimal services requirements are Apache, PHP ( >= 5.3.1 ), MySQL and PhpMyAdmin.

3. Database

Open PhpMyAdmin to create the database for the new installation. Click on the Databases tab, fill in the Database name field the name of the database that you want (Example: jqbuilder) and click the Create button.

4. JQBuilder package

Download the JQBuilder project package from here and move it to the htdocs folder where you installed XAMPP (Example: c:/xampp/htdocs ).

Click here to start the installation process.

5. Continue with the installation of JQBuilder by going through the next steps:

Database host, name, user, pass fields appear and they need to be filled with the correct information.
HTTP_HOST - should have the form http://<server_HTTP_HOST>/ <JQBuilderPathToInstall>/; if you run a local test server, will be set by default to http://localhost/JQbuilderTest/
Hostname - if left empty will be set by default to localhost;
DOC_ROOT - <JQBuilderPathToInstall> from where installed project will be running, by default will be set to JQbuilderTest
MYSQL_USER - if left empty, user will be set by default to "root"
MYSQL_PASS - if left empty, password will be empty string; if you have a password set to "root", there will be error trying to access the database if there was nothing introduced in this field
- To be able to use to use social widgets like facebook, twitter, linkedin or google you should fill the form with credentials received from each service when registering application. Google Client_ID
MSN client_id
Twitter consumer_key
LinkedIn api_key
Facebook appId

The last step will be the actual package installation: importing database, unpacking JQBuilder package and generating configuration files.

If all went well, you can now access your installed project using http://<server_HTTP_HOST>/ <JQBuilderPathToInstall>/ (i.e http://localhost/JQbuilderTest/)

Virtual host configuration

1. Download

Download the latest version of XAMPP for Windows from [HERE].

2. Install

After downloading, install the program to what directory you want.( Example: c:/xampp ). Minimal services requirements are Apache, PHP ( >= 5.3.1 ), MySQL and PhpMyAdmin.

3. Database

Open PhpMyAdmin to create the database for the new installation. Click on the Databases tab, fill in the Database name field the name of the database that you want (Example: jqsocial) and click the Create button.

4. Configuring the virtual host.

Open httpd.conf from ( XAMPP install directory ( Example: c:/xampp ) )/apache/conf with the preferred text editor.

Search for vhost_alias_module. It should be like this: #LoadModule vhost_alias_module modules/mod_vhost_alias.so Remove the # from the beginning so it looks like this ( if it's not already like this ): LoadModule vhost_alias_module modules/mod_vhost_alias.so Search for httpd-vhosts.conf. It should be like this: #Include conf/extra/httpd-vhosts.conf Remove the # from the beginning so it looks like this ( if it's not already like this ): Include conf/extra/httpd-vhosts.conf Open httpd-vhosts.conf from ( XAMPP install directory ( Example: c:/xampp ) )/apache/conf/extra with the preferred text editor. There will be some examples how to setup a virtual host. Add the required information as the comments describe ( # in front of a line is a comment ). Create a folder in XAMPP install directory ( Example: c:/xampp ) and call it how you want ( Example: vhosts ). This can be the directory that will hold all your virtual hosts.
<VirtualHost *:80>
    ServerAdmin [email protected]                    # This is e-mail address from which mail will be sent from php scripts.
    DocumentRoot "C:/xampp/vhosts/jqsocial.com"         # Your document root where all the files will go
    ServerName jqsocial.com                             # The domain name.
    ErrorLog "logs/jqsocial.com-error.log"              # Error log file name.
    CustomLog "logs/jqsocial.com-access.log" common     # Access log file name.
</VirtualHost>
                        
If you bought the domain jqsocial.com than move to the next step.
This way will make the service work only for you as it will be an alias of localhost.
Open the file hosts from C:/Windows/System32/drivers/etc and add at the end of it the following and save it: 127.0.0.1 jqsocial.com If you have problems saving the file open the text editor by tight clicking it and selecting "Run as Administrator", then open file and go to file location specified above.
If you have antivirus program that protects the file you will need to disable it in order to make the changes and enable it after you are done. If you bought the domain name, go to the registrars website and change the IP address to your public IP address ( can be found by accessing http://www.whatismyip.com/ Download the JQBuilder project package from here and move it to the htdocs folder where you installed XAMPP ( Example: c:/xampp/htdocs ).
Click here to start the installation process.

Continue with the installation of JQBuilder by going through the next steps:

Database host, name, user, pass fields appear and they need to be filled with the correct information.
HTTP_HOST - should have the form http://<server_HTTP_HOST> /<JQBuilderPathToInstall>/; if you run a local test server, will be set by default to http://localhost/JQbuilderTest/
Hostname - if left empty will be set by default to localhost;
DOC_ROOT - <JQBuilderPathToInstall> from where installed project will be running, by default will be set to JQbuilderTest
MYSQL_USER - if left empty, user will be set by default to "root"
MYSQL_PASS - if left empty, password will be empty string; if you have a password set to "root", there will be error trying to access the database if there was nothing introduced in this field
- To be able to use to use social widgets like facebook, twitter, linkedin or google you should fill the form with credentials received from each service when registering application. Google Client_ID
MSN client_id
Twitter consumer_key
LinkedIn api_key
Facebook appId

On Next step you should see all info introduced earlier, or generated by default. The last step will be the actual package installation: importing database, unpacking JQBuilder package and generating configuration files. If all went well, you can now access your installed project using http://<server_HTTP_HOST> /<JQBuilderPathToInstall>/ (i.e http://localhost/JQbuilderTest/)

How to integrate JQuery Plugin into JQPortal Widgets

  • 1. To create a custom Jquery Widget first you need to add the widget meta-data in the jportal_portlets table:
  • INSERT INTO `jportal_portlets` (`name` ,`portlet_data` ,`date` )
    VALUES ('My Custom Widget', '{ "title": "My Custom Widget", "class": "", 
    "functionality": "Widgets", "type": "myCustomWidget", "portletActions": 
    { "remove": true, "info": "I love my custom widget" }, "height":200, 
    "boxWidth":50, "boxHeight":50, "portletSource": "js/widgets/widget.js" }', 
    NOW( )
    );
                                

    Here is the meta-data of JQuery Plugin so you can see it better:

    {
        "title": "My Custom JQuery Widget",
        "class": "",
        "functionality": "Widgets",
        "type": "myCustomWidget",
        "portletActions": {
            "remove": true,
            "info": "I love my custom widget"
            },
        "height":200,
        "boxWidth":50,
        "boxHeight":50,
        "widgetSource": "js/widgets/widget.js"
    }
                                

  • Unlike other portlets, for custom JQuery widgets you have to define the source of the javascript file where the widget is defined. As you can see you can set options common to all portlets plus other options defined for your widget like height, boxHeight, boxWidth The type option is very important. Try to use the "widget" word in the widget constructor name to avoid conflicts with jqPortal (JQuery Portal) based Widgets
  • 2. Coding Guidelines -Here is the code for the Custom JQuery widget in the file "js/widgets/widget.js":
  •    function myCustomWidget(elem, options) {
                                        elem.html('
    Be Happy , Make Happy
    '); elem.find("#containment").height(options.height); elem.find("#draggable").height(options.boxHeight).width(options.boxWidth); elem.find("#draggable").draggable({ containment: elem.find("#containment"), scroll: false }); }

  • Here is the widget looks like:
  • 3. Here are some guidelines when creating new Custom JQuery widgets:
  • 3a. elem is the selector for the widget's content; use it when selecting elements inside the widget to avoid conflict with other portlets in the page
  • 3b. options are defined in the widget meta-data; as you can see the height of the container is 200 as it is set in the database, so are the width and height of the small movable box.
  • 3c. have default values for your options in case they are not set in the meta-data
  • 3d. you can add as many different widgets as you want in the database with different options for each one
  • 3e. you don't have to write the code for all the widgets in the same file; just remember to set the widgetSource option

How to integrate Extjs Widgets into JQPortal

  • First edit the header.tpl file that you will find in the includes/templates folder.
  • There add the reference to the extjs environment in the head tag
        <script type='text/javascript' charset="utf-8" src="http://cdn.sencha.io/ext-4.0.2/ext-all.js"></script>
        
  • Then add a reference to the css file
         <link rel="stylesheet" rev="stylesheet" type="text/css" href="css/ext-all.css" / >
    
        
  • Make sure the css code doesn't conflict with the jqbuilder css code by adding a custom class name that you will later use in your portlet.
    For example
    let's say you decided to use ext-widget as your custom class:
    table{border-collapse:collapse;border-spacing:0}
    will become:
    .ext-widgettable{border-collapse:collapse;border-spacing:0}
  • Make sure the css code doesn't conflict with the jqbuilder css code by adding a custom class name that you will later use in your portlet.
    For example
    if you copied the themes folder in the css/ext folder then
    : background-image:url('../../resources/themes/images/default/shared/shadow.png')
    becomes:
    background-image:url('ext/themes/images/default/shared/shadow.png')
  • Now follow these steps to build a Custom Extjs widget. you can add an Extjs Tab widget
  • Add the meta-data in the jportal_portlets table:
  •  INSERT INTO `jportal_portlets` (`name`,`portlet_data`,`date`)
    VALUES (
        'Ext Tab Widget',
        '{
            "title": "Ext Tab Widget",
            "class": "",
            "functionality": "Widgets",
            "type": "myExtTabWidget",
            "portletActions": { "remove": true, "info": "Ext Tab Widget" },
            "widgetSource": "js/widgets/ext.js"
        }',
        NOW( )
    );
  • Notice the widgetSource and the type settings. Add the file ext.js inside the js/widgets folder
  • Inside the ext.js file add the constructor for your widget: function myExtTabWidget(elem,options){}
  • Example
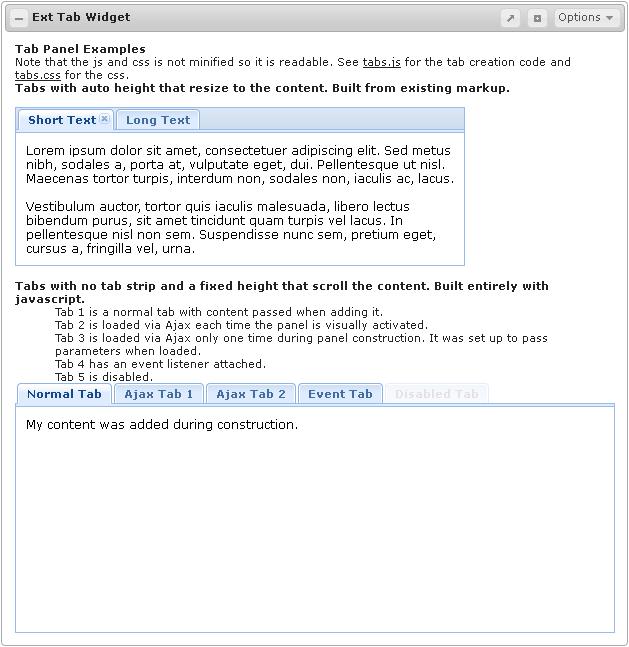
    I am going to use the tabs example provided by Extjs. First add the html code:
  • Now add your custom class (the one that you added in the css code) to your widget: elem.addClass("ext-widget");
  • Now you can apply the Extjs plugins to your markup:
    Ext.require('Ext.tab.*');
    Ext.onReady(function(){
        // basic tabs 1, built from existing content
        var tabs = Ext.createWidget('tabpanel', {
            renderTo: 'tabs1',
            width: 450,
            activeTab: 0,
            defaults :{
                bodyPadding: 10
            },
            items: [{
                contentEl:'script',
                title: 'Short Text',
                closable: true
            },{
                contentEl:'markup',
                title: 'Long Text'
            }]
        });
    
        // second tabs built from JS
        var tabs2 = Ext.createWidget('tabpanel', {
            renderTo: 'tabs2',
            activeTab: 0,
            width: 600,
            height: 250,
            plain: true,
            defaults :{
                autoScroll: true,
                bodyPadding: 10
            },
            items: [{
                    title: 'Normal Tab',
                    html: "My content was added during construction."
                },{
                    title: 'Ajax Tab 1',
                    loader: {
                        url: 'info.html',
                        contentType: 'html',
                        loadMask: true
                    },
                    listeners: {
                        activate: function(tab) {
                            tab.loader.load();
                        }
                    }
                },{
                    title: 'Ajax Tab 2',
                    loader: {
                        url: 'info.html',
                        contentType: 'html',
                        autoLoad: true,
                        params: 'foo=123&bar=abc'
                    }
                },{
                    title: 'Event Tab',
                    listeners: {
                        activate: function(tab){
                            alert(tab.title + ' was activated.');
                        }
                    },
                    html: "I am tab 4's content. I also have an event listener attached."
                },{
                    title: 'Disabled Tab',
                    disabled: true,
                    html: "Can't see me cause I'm disabled"
                }
            ]
        });
    });
    
  • That's it. Now you can add developed Extjs widget using the content manager. The result looks like this:

How to integrate YUI Widgets into JQPortal

  • First you need to edit the header.tpl file that you will find in the includes/templates folder.
  • There you must add the reference to the yui environment in the head tag:

    <script type="text/javascript" charset="utf-8" src="http://yui.yahooapis.com/3.3.0/build/yui/yui-min.js"></script>

  • Then you must add a reference to the css file

    <link rel="stylesheet" rev="stylesheet" type="text/css" href="css/yui.css" />

  • Make sure the css code doesn't conflict with the jqbuilder css code by adding a custom class name that you will later use in your portlet.
    For example
    - let's say you decided to use yui-widget as your custom class:

    p { line-height: 1.6em; }
    will become:
    .yui-widget p { line-height: 1.6em; }

  • Now if you follow the steps describing how to build a custom widget you can add a YUI widget in the same way. Let say you want to add a YUI accordion widget:


    add the meta-data in the jportal_portlets table:
    INSERT INTO `jportal_portlets` (`name`,`portlet_data`,`date`)
    VALUES (
    'YUI Accordion Widget',
    '
    "title": "YUI Accordion Widget",
    "class": "",
    "functionality": "Widgets",
    "type": "myYuiAccordionWidget",
    "portletActions": { "remove": true, "info": "YUI Accordion Widget" },
    "widgetSource": "js/widgets/yui.js"
    }',
    NOW( )
    );
  • Notice the widgetSource and the type settings. Add the file yui.js inside the js/widgets folder
  • Inside the yui.js file add the constructor for your widget:
                                        function myYuiAccordionWidget(elem,options)
                                    
    First add the html code:
  • Now add your custom class (the one that you added in the css code) to your widget: elem.addClass("yui-widget");
  • For the accordion widget you also need to add a theme class and set the container height elem.addClass("yui3-skin-sam"); elem.css("height","400px");
  • Now you can apply the YUI plugins to your markup:
                                    YUI({
                                        gallery : 'gallery-2011.03.23-22-20'
                                    }).use( 'dd-constrain', 'dd-proxy', 'dd-drop', 'gallery-accordion', function(Y) {
                                            var accordion;
    
                                            accordion = new Y.Accordion( {
                                                srcNode: "#acc1",
                                                useAnimation: true,
                                                reorderItems: true
                                            });
    
                                            accordion.render();
                                        });
                                    
  • That's it. Now you can add you widget using the content manager. The result looks like this:

How to integrate Dojo Widgets into JQPortal

  • First you need to edit the header.tpl file that you will find in the includes/templates folder.
  • There you must add the reference to the yui environment in the head tag:
    <script src="http://ajax.googleapis.com/ajax/libs/dojo/1.6/dojo/dojo.xd.js" djConfig="parseOnLoad: true"></script>
          
  • Then you must add a reference to the css file

    <link rel="stylesheet" type="text/css" href="http://ajax.googleapis.com/ajax/libs/dojo/1.6/dijit/themes/claro/claro.css"/>
    
  • Now if you follow the steps describing how to build a custom widget you can add a Dojo widget in the same way. Lets say you want to add a Dojo Edit Box widget:
    add the meta-data in the jportal_portlets table:
    INSERT INTO `jportal_portlets` (`name`,`portlet_data`,`date`)
    VALUES (
        'Dojo Edit Box',
        '{
            "title": " Dojo Edit Box Widget",
            "class": "",
            "functionality": "Widgets",
            "type": "myDojoEditBoxWidget",
            "portletActions": { "remove": true, "info": "Dojo Edit Box Widget" },
            "widgetSource": "js/widgets/yui.js"
        }',
        NOW( )
    );


  • Notice the widgetSource and the type settings. Add the file dojo.js inside the js/widgets folder
  • Inside the dojo.js file add the constructor for your widget: function myDojoEditBoxWidget(elem,options)
  • First add the html code:


    elem.html('<div dojoType="dijit.InlineEditBox" editor="dijit.Editor" renderAsHtml="true" autoSave="false" editorParams="{height: \'\', extraPlugins: [\'dijit._editor.plugins.AlwaysShowToolbar\']}">'); 


  • You can add a theme class for you widget

    elem.addClass("claro");
    
  • Now you can apply the Dojo plugin to your markup:

    dojo.require("dijit.InlineEditBox");
    dojo.require("dijit.Editor");
    dojo.require("dijit._editor.plugins.AlwaysShowToolbar");
    
  • That's it. Now you can add you widget using the content manager. The result looks like this:
  • Here is the complete code of the dojo.js file:


    function myDojoEditBoxWidget(elem,options){
        elem.html('<div dojoType="dijit.InlineEditBox" editor="dijit.Editor" renderAsHtml="true" autoSave="false" editorParams="{height: \'\', extraPlugins: [\'dijit._editor.plugins.AlwaysShowToolbar\']}">